January 27, 2026 | Jennifer Hughes

Understanding the Health Risks of Mold Exposure with a Trusted Mold Removal Company Jacksonville, FL

Cleaning mold using a sponge on a wall stock photo

Mold exposure is a growing concern, as it can significantly affect your health and overall well-being. Understanding the potential risks associated with mold and how it impacts your body is crucial to maintaining a healthier living environment. This section explores the various health effects of mold exposure, identifying symptoms, and ways to protect yourself.

Common Health Risks of Mold Exposure

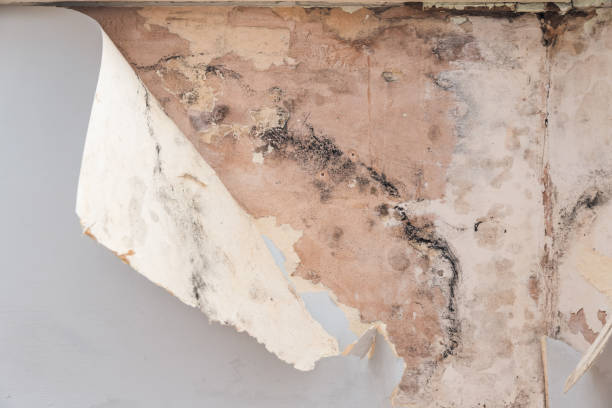
Mold produces allergens, irritants, and sometimes toxic substances known as mycotoxins.

  1. Chronic coughing or wheezing
  2. Shortness of breath or difficulty breathing
  3. Aggravation of asthma symptoms
  4. Sneezing and nasal congestion
  5. Skin rashes or irritation
  6. Watery or itchy eyes
  7. Chronic Fatigue
    Prolonged exposure to mold can lead to persistent fatigue, impacting your energy levels and productivity.
  8. Neurological Symptoms (in severe cases)
    High levels of mold exposure can cause headaches, dizziness, memory issues, and trouble concentrating.

The severity of these symptoms largely depends on factors such as the type of mold present, duration of exposure, individual susceptibility (e. g. , allergies), and pre-existing health conditions like asthma or autoimmune disorders.

Vulnerable Groups at Higher Risk

  • Infants and children
  • Elderly individuals
  • People with respiratory conditions such as asthma or COPD
  • Individuals with weakened immune systems due to illnesses or medications

Long-Term Impacts on Health

Prolonged exposure to indoor mold may result in chronic health problems if not addressed promptly. Conditions like allergic bronchopulmonary aspergillosis (caused by specific types of molds) may develop in rare cases. Additionally, long-term damp environments associated with mold growth have been linked to an increased likelihood of developing respiratory infections over time.

Steps to Safeguard Your Well-Being Against Mold Exposure

  1. Schedule Inspections:Regular checks for water damage or damp areas can help detect hidden mold early.
  2. Control Humidity Levels:Maintain indoor humidity below 60% using dehumidifiers where necessary.
  3. Improve Ventilation:Ensure proper airflow in bathrooms, kitchens, basements, and other moisture-prone spaces.
  4. Prompt Repairs:Fix leaks in roofs, pipes, windowsills promptly to prevent water accumulation.
  5. Wear Protective Gear:If cleaning mild cases of surface mold yourself (e. g. , using soap and water), wear gloves and masks for added protection.
Symptom Likely Cause Suggested Action
Persistent Cough Mold spores irritating airways Consult a medical professional; inspect for hidden mold
Skin Rashes Direct contact with contaminated materials Avoid touching affected surfaces; clean thoroughly
Nasal Congestion Allergic reaction Use air purifiers; remove visible sources immediately

Awareness about the health consequences linked to prolonged mold exposure empowers you not only to take preventive measures but also equips you with knowledge for swift remediation when necessary.

Make addressing indoor air quality a priority—not just for your physical health but also for enhancing daily comfort in your living space.

Complete Jacksonville, FL Mold Remediation Guide for Effective Removal and Prevention Techniques

Dealing with mold requires a systematic approach to ensure its removal and prevent future growth. Mold can not only damage your property but also pose significant health risks. Learning how to effectively handle mold issues is critical for maintaining a safe and healthy living environment. Below is a detailed guide on the most effective mold removal and prevention techniques.

Step 1: Assessing the Mold Problem

Before addressing the issue, it’s essential to evaluate the extent of the mold growth.

  • Inspect visible areas: Look for discoloration or surface stains, which are common signs of mold.
  • Smell for musty odors: Mold often produces a distinct, unpleasant smell.
  • Check hidden spaces: Investigate under carpets, behind walls, or inside HVAC systems where mold might be growing unnoticed.

Step 2: Effective Mold Removal Techniques

  1. A mixture of water and detergent can remove surface mold on hard materials.
  2. For tougher spots, use a bleach solution (1 cup bleach per gallon of water). Be sure to ventilate the area thoroughly.
  3. Use a stiff-bristled brush for porous materials like wood or drywall.
  4. Avoid dry brushing as it may release spores into the air.
  5. Severely damaged items such as carpets or insulation should be discarded.
  6. Place items in sealed plastic bags before disposal to minimize spore spread.
  7. Vacuum with HEPA filters: Regular vacuuming with HEPA filters removes loose spores from surfaces and improves air quality.

Step 3: Preventing Future Mold Growth

Prevention is just as important as removal when dealing with mold problems.

  • Control indoor humidity levels: Maintain humidity below 60%, using dehumidifiers if necessary.
  • Repair leaks promptly: Fix any leaky roofs, windows, or plumbing as soon as possible to eliminate moisture sources.
  • Improve ventilation in high-moisture areas: Use exhaust fans in bathrooms, kitchens, and laundry rooms while keeping air circulating throughout your home.
  • Clean gutters regularly: Blocked gutters can lead to water infiltration near your home’s foundation that promotes mold growth indoors.

Comparative Table: DIY vs Professional Mold Removal

Criterion DIY Approach Professional Services
Cost Low-cost (cleaners & tools) Higher cost due to expertise
Time Can be time-consuming More efficient process
Effectiveness May miss hidden areas Comprehensive detection/removal
Safety Risk of spore exposure Trained personnel with safety gear

While small infestations can often be handled independently using DIY solutions, larger outbreaks may require professional assistance to ensure thorough remediation.

Additional Tips for Long-Term Maintenance

  • Schedule regular inspections for dampness or leaks around the house.
  • Avoid carpeting in rooms like basements where moisture levels are higher.
  • Invest in moisture sensors for early detection in vulnerable areas like basements and crawl spaces.

By staying vigilant about moisture control and following proper cleaning protocols, you’ll significantly reduce the risk of recurring issues related to indoor molds.

Effective Tips for Black Mold Removal Jacksonville, FL: Identifying Problem Areas in Your Home

Mold growth can be a persistent issue in many homes, often going unnoticed until it becomes a serious health or structural problem. Identifying the areas most susceptible to mold is essential for effective prevention and removal. Mold thrives in damp, humid environments, but its presence is not always obvious. Below is a guide to help you pinpoint the most common areas where mold could develop in your home.

Common Areas Prone to Mold Growth

  1. Why it’s Vulnerable: Bathrooms are prime locations for mold due to constant moisture from showers, sinks, and toilets. Poor ventilation can exacerbate the problem.
    • Shower stalls and bathtubs
    • Grout between tiles
    • Underneath sinks and around plumbing fixtures
    • Behind toilets
  2. Why it’s Vulnerable: Kitchens generate steam from cooking and washing dishes, while leaks under sinks or behind appliances create damp conditions.
    • Underneath kitchen sinks
    • Around dishwashers and refrigerators (especially near water lines)
    • Near stovetops where steam accumulates on walls
  3. Why it’s Vulnerable: Basements often have high humidity levels due to poor air circulation or water seeping through walls. Crawl spaces are also prone to moisture from the soil.
    • Walls and floors near foundation cracks
    • Around sump pumps or drainage systems
    • Stored cardboard boxes or other organic materials
  4. Why it’s Vulnerable: Washing machines can contribute to excess humidity, especially if there is poor ventilation.
    • Behind washing machines where water hoses connect
    • Nearby walls that absorb moisture
  5. Why it’s Vulnerable: Ductwork that accumulates condensation or dirty filters can encourage mold growth.
  6. Key Spots to Inspect:
    • Inside air ducts
    • Filters that haven’t been replaced regularly

Characteristics of Mold-Prone Areas

Environmental Factor Impact on Mold Growth
High Humidity (above 60%) Sustains mold spores and promotes growth
Poor Ventilation Traps moisture in enclosed spaces
Water Leaks Provides consistent sources of dampness
Organic Materials (wood, drywall) Acts as food sources for mold

Tips for Regular Inspection

  • Check these high-risk areas monthly for any visible signs of discoloration or musty odors.
  • Use a flashlight when inspecting hard-to-reach corners like underneath appliances or inside crawl spaces.
  • Keep an eye out for water stains on ceilings, walls, or flooring.

By staying vigilant and routinely inspecting these common problem areas in your home, you can address potential issues early before they escalate into significant challenges requiring costly remediation efforts.

Exterminator working stock photo

Expert Mold Removal Services Jacksonville, FL: Professional Water Damage Restoration Solutions

Water damage and mold growth often go hand in hand, making it essential to address both issues simultaneously. Effective water damage restoration, combined with targeted mold removal strategies, ensures a safer and healthier living environment. Below is a detailed breakdown of professional methods used by experts to tackle these problems comprehensively.

Step 1: Assessing the Extent of the Damage

Before beginning restoration or removal, professionals conduct a thorough inspection to evaluate the severity of water damage and mold growth.

  • Moisture Mapping: Using specialized tools like moisture meters to identify areas affected by excess water.
  • Mold Testing: Sampling air quality or surface swabs to determine the type and extent of mold present.
  • Visual Inspection: Checking for visible signs such as discoloration, warping, or musty odors.

This assessment helps create a tailored plan for restoration and remediation.

Step 2: Water Extraction and Drying

Removing excess water is critical in preventing further damage and halting mold growth.

  • Industrial-Grade Pumps: Used to extract standing water from floors, carpets, or basements.
  • Dehumidification Systems: High-capacity dehumidifiers reduce indoor humidity levels quickly.
  • Air Movers: These powerful machines improve airflow across affected surfaces to speed up drying.

Proper drying typically requires monitoring over several days to ensure no hidden moisture remains trapped in walls or subfloors.

Step 3: Containing Mold Spread During Remediation

  • Sealing off contaminated areas with plastic sheeting and negative air chambers.
  • Using HEPA (High-Efficiency Particulate Air) filters to capture airborne spores during cleanup.
Equipment Used Purpose
HEPA Vacuums Remove loose mold particles
Air Scrubbers Purify indoor air
Protective Barriers Contain spores within one area

These precautions are essential for ensuring successful remediation while protecting other parts of the home.

Step 4: Safe Mold Removal Techniques

  1. Surfaces are cleaned with antimicrobial solutions that kill existing mold colonies.
  2. Severely contaminated materials are safely removed and disposed of according to local regulations.
  3. Sanding may be necessary for deep infestations after cleaning with chemical agents.

Professionals ensure that treated areas meet safety standards before restoration resumes.

Step 5: Restoring Damaged Areas

Once remediation is complete, restoring affected areas ensures your home returns to its pre-damage condition.

  • Repairing damaged drywall or flooring.
  • Repainting walls using mold-resistant paint.
  • Installing materials designed to withstand future moisture exposure (e. g. , vinyl flooring).

These measures not only restore aesthetics but also help prevent recurring problems.

Benefits of Hiring Professionals for Mold Removal

  • Access to advanced tools like infrared cameras for detecting hidden moisture zones.
  • Expertise in safe handling practices reduces health risks from exposure during cleanup.
  • Long-term solutions backed by warranties provide peace of mind.

Investing in qualified professionals ensures comprehensive results while protecting both your property and health effectively over time.

Professional Methods for Water Damage Restoration and Mold Removal

When faced with water damage and mold problems, employing professional methods ensures effective remediation and prevents further property damage or health risks. Below, we explore various specialized techniques used by professionals to address water damage and remove mold safely.

Steps in Water Damage Restoration

  1. Professionals begin by assessing the extent of water damage using moisture meters, thermal imaging cameras, or other specialized tools.
  2. This step helps identify affected areas, including hidden pockets of moisture that could lead to future mold growth.
  3. Industrial-grade pumps and vacuums are used to remove standing water quickly to minimize further damage.
  4. High-powered equipment ensures efficiency in large-scale water removal efforts.
  5. After water extraction, professionals deploy air movers and dehumidifiers to dry out the property thoroughly.
  6. Hygrometers are regularly used to monitor the drying process and ensure that moisture levels drop below mold-supporting thresholds.
  7. Surfaces impacted by water are cleaned using antimicrobial agents to kill bacteria or mold spores that may have started developing.
  8. Personal protective equipment (PPE) is used during this process to ensure safety.
  9. Damaged flooring, drywall, or other structural elements are repaired or replaced during this phase. Restoration work ensures the building is returned to its pre-damage condition.

Advanced Mold Removal Techniques

  • Containment Strategies: Plastic sheeting or negative air pressure systems prevent the spread of airborne mold spores during removal.
  • HEPA Vacuuming: High-Efficiency Particulate Arrestor (HEPA) vacuums capture microscopic spores from surfaces without disturbing them.
  • Soda blasting or dry ice blasting efficiently removes stubborn molds from porous materials like wood without causing extensive damage.
  • These methods are effective for deep-seated infestations while minimizing waste residue.
  • Antimicrobial Treatments: Application of fungicides prevents regrowth on treated areas.
  • Disposal of Contaminated Materials: Heavily infested building materials are carefully removed, sealed in heavy-duty bags, and disposed of according to local regulations.

Why Choose Professional Services?

Benefits Description
Expertise Trained technicians understand how to handle complex infestations safely.
Specialized Equipment Access to industrial-grade tools ensures thorough results.
Prevention Focus Professionals identify underlying causes like leaks or poor ventilation.
Health Protection Proper containment minimizes exposure risks for occupants during removal.

Choosing specialists ensures your property is not only free from visible signs of damage but also protected against future issues caused by hidden factors like residual moisture or lingering spores.

By following these expert approaches for water restoration and mold removal, you can ensure both safety and long-term protection for your home or business environment.

Essential Tips for Improving Ventilation and Air Circulation to Reduce Mold Growth

Proper ventilation and air circulation play a critical role in mitigating mold growth in your living or working spaces. Poor airflow and trapped moisture create an ideal environment for mold spores to settle and thrive. By understanding how to improve the movement of air in your home, you can significantly reduce the chances of mold accumulation. Below are actionable tips to optimize ventilation and promote healthy air circulation.

Assess Your Home’s Ventilation

Before implementing any changes, evaluate your home’s current ventilation system. Look for areas with high humidity or poor airflow such as basements, bathrooms, kitchens, or attics.
– Condensation on windows or walls
– Persistent musty odors
– Visible mold spots in corners or along surfaces

Identifying these problem areas will help you target specific spaces that require attention.

Use Exhaust Fans in Key Areas

Installing exhaust fans is one of the most effective ways to control moisture levels in enclosed spaces:
Bathrooms: Run a vent fan during and after showers to expel steam and reduce humidity. Ensure it vents outdoors instead of recirculating indoor air.
Kitchens: Use range hoods over stoves while cooking to remove heat, grease particles, and moisture from the air.

Regular cleaning and maintenance of these fans ensure they work efficiently.

Open Windows Regularly

Opening windows is a simple yet powerful way to improve airflow naturally.
– Create cross-ventilation by opening windows on opposite sides of a room or home. This facilitates the replacement of stale indoor air with fresh outdoor air.
– Avoid keeping windows open during rainy weather as this may increase indoor humidity levels.

Dehumidifiers as Supplemental Tools

Room Type Recommended Humidity Level Tips
Bathroom 30%-50% Place a small portable dehumidifier
Basement 30%-50% Select units designed for large spaces

Check the device regularly for water buildup and clean filters according to manufacturer instructions.

Maintain HVAC Systems

Your home’s heating, ventilation, and air conditioning (HVAC) system contributes significantly to overall indoor air quality:
1. Replace HVAC filters every 1–3 months depending on usage. Clogged filters restrict airflow while allowing dust particles and allergens to circulate. 2. Schedule professional duct cleaning services periodically if you suspect dust buildup within the system. 3. Consider installing whole-house ventilators that work alongside HVAC systems to introduce fresh outdoor air continuously.

Proper Furniture Placement

Poor furniture placement can inadvertently obstruct airflow within rooms: – Avoid pushing large furniture items directly against walls since this limits circulation around those surfaces. – Leave adequate space beneath beds or couches so that stagnant pockets of humid air do not form underneath.

Inspect Attics & Crawl Spaces

Attics and crawl spaces are notorious for harboring trapped moisture due to limited natural light or inadequate ventilation: 1. Install ridge vents or soffit vents in attics where appropriate. 2. Use vapor barriers on crawl space floors if condensation issues persist.

By addressing these overlooked areas, you can prevent isolated mold growth from spreading across your property.

Improved ventilation contributes not only toward reducing indoor humidity but also promotes better respiratory health by reducing airborne contaminants like mold spores, pollen, or pet dander present indoors over extended periods—making it an essential strategy for maintaining a safer living environment year-round.


January 27, 2026 | Jennifer Hughes

Mold Prevention Tips for Kitchens to Keep Your Home Safe

Man uses a sponge to remove stains of toxic mold and fungal bacteria on the wall in the corner near the door. Concept of condensation, moisture. Problems with ventilation. High humidity. stock photo

Mold in kitchens can not only damage your home but also pose health risks to you and your family. Kitchens are particularly vulnerable to mold growth due to high humidity levels, frequent water usage, and organic materials like food that can serve as a food source for mold. By taking proactive steps, you can significantly reduce the risk of mold development in this essential area of your home. Below are practical tips and strategies to help keep your kitchen mold-free.

Address Moisture Issues

Mold thrives in moist environments, so controlling moisture is the first step in prevention.
Fix Leaks:Regularly check under sinks, around faucets, and near appliances like dishwashers for leaks or pooling water. Address any issues immediately.
Improve Ventilation:Use an exhaust fan or open windows while cooking or running hot water to reduce humidity levels. Ensure your kitchen has proper airflow at all times.
Dry Spills Promptly:Wipe up spills on countertops, floors, or cabinets immediately before they have a chance to seep into surfaces.

Manage Humidity Levels

Maintaining an appropriate level of humidity in your kitchen is crucial:
Use a Dehumidifier:If your kitchen tends to stay humid even with ventilation, consider using a dehumidifier to keep humidity below 50%.
Monitor Humidity:Invest in a hygrometer (humidity meter) to regularly check levels within the room.

Humidity Range Mold Risk Recommended Action
30%-50% Low Risk Maintain this range with ventilation
50%-70% Moderate Risk Consider additional measures like dehumidifiers
Above 70% High Risk Address moisture sources immediately

Keep Surfaces Clean and Dry

Regular cleaning can go a long way toward preventing the growth of mold:
1.Clean Cabinets Regularly:Empty cupboards periodically and clean them with mild soap and water or vinegar-based solutions. Ensure they are completely dry before returning items inside. 2.Inspect Pantry Items:Check stored grains, flours, and other food items for signs of spoilage or mold contamination. 3.Disinfect Trash Areas:Clean trash cans frequently since spills from discarded food can promote mold growth.

Store Food Properly

Improper storage of food contributes significantly to mold problems: – Store perishable items like fruits and vegetables in the refrigerator instead of leaving them out on counters. – Use air-tight containers for flour, sugar, rice, and other pantry staples. – Avoid overstocking shelves as overcrowded spaces may trap moisture.

Inspect Kitchen Appliances

Appliances such as refrigerators or dishwashers are often overlooked during routine cleaning but can harbor hidden moisture pockets: – Clean refrigerator drip pans regularly. – Ensure seals on refrigerator doors are tight-fitting without cracks. – Check dishwasher filters for residue buildup that could encourage mold.

Additional Preventative Measures

A few extra precautions can provide added protection against potential problems: – Use Mold-Resistant Paints:Apply anti-microbial paint on walls near sinks or stoves prone to splashes.Install Waterproof Backsplashes:Protect walls behind sinks from water damage with waterproof materials such as tiles.

By implementing these strategies consistently over time—alongside maintaining vigilance about any visible signs—you will greatly minimize risks related-to Kitchen-based molds

How to Choose the Best Mold Removal Company Jacksonville, FL Residents Trust

Preventing mold in your kitchen is essential for maintaining a healthy home environment. Kitchens, due to their high levels of moisture, warmth, and food residue, are particularly susceptible to mold growth. Proper prevention strategies can save you time, money, and health risks associated with exposure to mold. Below are actionable tips to help you keep your kitchen mold-free.

Maintain Proper Ventilation

Moisture buildup often leads to mold proliferation, and ventilation helps reduce excess humidity.

  • Use an exhaust fan when cooking or running the dishwasher.
  • Open windows periodically to let fresh air circulate.
  • Ensure that vents above stoves are functioning properly.

For homes without built-in ventilation systems, consider using a dehumidifier to reduce overall moisture levels in the kitchen.

Mold thrives in damp environments, so it’s important to minimize water accumulation wherever possible.

  • Immediately wipe up spills on counters and floors.
  • Check for leaks under sinks or around dishwashers regularly. Address any plumbing issues promptly.
  • Dry dishes and utensils thoroughly before putting them away.
  • Use absorbent mats near sinks and dish racks to catch excess water.

Clean Regularly

Focus on areas prone to food splatter or water accumulation:
1.Counters– Clean countertops daily with non-toxic disinfectants or vinegar solutions. 2.Refrigerators– Discard expired food promptly; clean door seals and shelves monthly. 3.Sink Drains– Flush drains weekly using baking soda and vinegar. 4.Trash Bins– Wash bins with soap and warm water regularly; consider using liners.

Store Food Properly

Improper food storage can contribute to mold growth in your kitchen:
– Keep perishable items like fruits and vegetables refrigerated at proper temperatures (below 40°F).
– Store dry goods such as flour, sugar, or grains in airtight containers to prevent moisture exposure. – Dispose of spoiled food immediately as it can attract pests and promote microbial growth.

Inspect Hidden Areas

Mold often develops in spots that are not immediately visible but still exposed to moisture:
– Check behind appliances such as refrigerators and stoves for condensation buildup or leaks. – Regularly inspect cabinets under sinks for signs of dampness or water stains. – Look at caulking around sinks, backsplashes, or windows; replace any worn-out sealing materials that could allow water infiltration.

Monitor Humidity Levels

Investing in a hygrometer can help you keep track of humidity levels within your kitchen environment.

Humidity Level Risk Level Recommended Action
Below 30% Low (dry air) Increase humidity if needed (e.g., humidifier).
30–50% Ideal (minimal mold risk) Maintain current conditions.
Above 60% High (mold-friendly) Use a dehumidifier immediately.

Keeping relative humidity between 30–50% minimizes the chance of condensation forming on surfaces – an essential factor for avoiding fungal growth.

Avoid Porous Materials

When renovating kitchens or updating decor:
– Opt for nonporous materials like stainless steel or sealed tiles over wood or unsealed granite. – Use washable rugs instead of carpets since they absorb less moisture over time.

By following these guidelines diligently, homeowners can create an inhospitable environment for potential mold infestations while preserving the cleanliness and safety standards crucial for spaces where food handling occurs regularly.

Effective Jacksonville, FL Mold Remediation Tips for Your Kitchen

Mold thrives in damp, warm environments, making the kitchen one of the prime areas for mold growth in the home. By adopting proactive measures, you can significantly reduce the risks and maintain a clean and healthy space. Below are practical and actionable tips to help you prevent mold growth in your kitchen.

Identify Common Mold-Prone Areas

Mold is most likely to grow in places where moisture gathers or lingers.
Sink area: Leaky faucets or wet sponges can create a breeding ground for mold.
Refrigerator drip trays: Condensation buildup can accumulate if not cleaned regularly.
Underneath appliances: Dishwashers, microwaves, and other equipment may trap moisture unnoticed.
Window sills: Excess humidity from cooking or washing can settle here over time.

Maintain Proper Ventilation

Adequate airflow is crucial in preventing moisture buildup, which is essential for mold prevention.
1.exhaust fanwhen cooking or washing dishes to remove steam and prevent humidity from accumulating. 2. Open windows periodically to allow fresh air circulation. 3. Install a dehumidifier if your kitchen feels excessively humid.

Keep Your Kitchen Dry

Moisture control is one of the most effective ways to limit mold growth in any space, especially kitchens.
– Wipe down countertops and sinks after use to eliminate standing water. – Fix any leaks immediately—whether they’re coming from pipes, faucets, or appliances. – Dry dishes and utensils completely before storing them inside cabinets. – Do not leave damp towels or sponges lying around; hang them up to dry properly.

Practice Regular Cleaning Habits

Frequent cleaning helps eliminate spores before they can develop into noticeable mold colonies.
| Area/Item | Cleaning Frequency | Recommended Products |
|———————|———————-|———————————–|
| Refrigerator seals | Weekly | Mild soap & water |
| Sink drains | Bi-weekly | Baking soda + vinegar solution |
| Cutting boards | After each use | Hot soapy water |
| Walls & backsplashes| Monthly | Anti-mold spray |

Dust regularly as well, as airborne particles may contain mold spores that settle on surfaces.

Monitor Humidity Levels

High humidity fosters ideal conditions for mold proliferation in enclosed spaces like kitchens. To manage this effectively: – Keep indoor humidity levels below 50%. Consider using a hygrometer (humidity monitor) for accurate readings. – Avoid boiling large pots of water without venting steam through an exhaust fan or an open window.

Store Food Properly

Spoiled food is another common source of molds that spread quickly across surfaces like shelves and countertops: – Refrigerate perishable items promptly at proper temperatures (~40°F). – Inspect fruits/vegetables often; discard any with visible signs of decay immediately.

Use Mold Prevention Products Where Needed

Certain products are designed specifically to deter fungi growth: 1) Anti-fungal sprays work great when applied around sinks/walls prone to spills etc.

By combining these strategies consistently will proactively block Molds safekeeping Kitchens cleaner greener

A person with a spatula removes stains of toxic mold and fungal bacteria on the wall in the corner near the door. Concept of condensation, moisture. Problems with ventilation. High humidity. stock photo

Your Ultimate Guide to Mold Prevention and Remediation Services

Mold is a common household issue that can lead to serious health risks and structural damage if not addressed promptly. If you’re considering professional mold remediation services, it’s essential to understand the process, the benefits of hiring experts, and what to look for in a reliable service provider. This guide will help you make informed decisions about mold prevention and remediation.

Benefits of Professional Mold Remediation Services

While small-scale mold issues can sometimes be addressed with DIY methods, professional mold remediation services are often the best choice for widespread or recurring problems.

  • Comprehensive Assessment: Experts can identify the root cause of moisture buildup that fuels mold growth.
  • Thorough Removal: Professionals use advanced techniques and equipment to ensure all mold spores are eliminated.
  • Prevention Strategies: Mold remediation companies often provide advice on preventing future outbreaks.
  • Health Safety: Proper containment and cleanup prevent airborne spores from spreading during the process.

Key Steps in Professional Mold Remediation

Understanding how professional services work can give you peace of mind when hiring a provider.

  1. Professionals inspect your home for visible signs of mold growth.
  2. Air quality tests may be conducted to detect hidden spores.
  3. The affected area is sealed off to prevent cross-contamination using plastic sheeting or negative air chambers.
  4. Air scrubbers and HEPA filters are used to remove airborne spores during cleanup.
  5. Porous materials like drywall or carpet that cannot be salvaged are safely removed and disposed of.
  6. Surfaces are cleaned with antimicrobial solutions, killing any remaining mold colonies.
  7. Damaged areas may require repairs or reconstruction once the mold has been eradicated.

How to Choose a Reliable Mold Remediation Service

Selecting the right partner for your remediation needs is critical for effective results.

Criteria What to Look For
Certification Ensure technicians are certified by organizations like the IICRC (Institute of Inspection Cleaning and Restoration Certification).
Experience Research how long they’ve been in business and their track record with similar cases.
Warranty A reputable company should offer guarantees on their work.
Reviews & References Check customer reviews online or ask for references from previous clients.
Insurance Verify that they carry proper liability insurance in case of accidental property damage.

Tips for Preventing Future Mold Growth

  • Control indoor humidity levels with dehumidifiers, especially in damp areas like basements and kitchens.
  • Fix leaks promptly in plumbing, roofing, or HVAC systems.
  • Improve ventilation by using exhaust fans in bathrooms, kitchens, and laundry rooms.
  • Regularly inspect areas prone to moisture such as under sinks, around windowsills, or near appliances like dishwashers.

By taking these steps and partnering with skilled professionals when needed, you can protect your home from harmful mold growth while ensuring a healthier living environment for your family.

What to Know About Choosing the Right Partner for Mold Remediation

When it comes to mold remediation, selecting the right partner is critical for ensuring effective, long-lasting results. Mold poses significant health risks and structural damage if not handled properly. Here are the essential factors to consider when choosing a mold remediation professional.

One of the most important factors to assess is whether the remediation company holds proper certifications and licenses.IICRC (Institute of Inspection Cleaning and Restoration Certification): Specializes in standards for mold remediation.NORMI (National Organization of Remediators and Mold Inspectors): Provides rigorous training in safe mold removal.

Licensed companies often follow state regulations, ensuring their processes meet safety and industry standards.

Mold remediation requires expertise, particularly for severe infestations that have spread across multiple areas or contaminated HVAC systems. When reviewing potential partners: – Ask how long they’ve been in business. – Inquire about their specific expertise with residential versus commercial properties. – Check if they handle specialized cases like black mold removal or water-damaged structures.

Reputable mold remediation companies typically offer an initial inspection or assessment before beginning work. During this visit: – They should identify the source of moisture causing mold growth. – Provide detailed findings on affected areas. – Outline a recommended approach to resolve both the infestation and its underlying causes.

Ensure they use advanced techniques such as thermal imaging cameras or moisture meters during this process.

A trustworthy partner will clearly explain their step-by-step approach to removing mold while preventing its recurrence. Key steps should include: 1. Containing the affected area to prevent spores from spreading. 2. Using HEPA filtration systems during cleanup. 3. Removing damaged materials when necessary (e. g. , drywall, insulation). 4. Treating surfaces with antimicrobial solutions post-removal.

Their process should also emphasize drying out structures completely to eliminate excess moisture.

Step Purpose
Containment Limits spore spread during removal
HEPA Filtration Captures airborne particles effectively
Removal of Materials Eliminates heavily contaminated components
Antimicrobial Treatment Prevents future fungal growth

Customer feedback provides insight into a company’s reliability, professionalism, and overall effectiveness. When conducting research: – Read online reviews on platforms like Google, Yelp, or Better Business Bureau (BBB). – Ask for referrals from previous clients who can share their firsthand experiences. – Examine case studies or before-and-after photos if available.

Be cautious of companies with consistently poor reviews or unresolved complaints.

A good remediation partner stands behind their work with warranties on services provided. Post-remediation support may include retesting after cleanup or periodic inspections to ensure no reoccurrence of issues.

Questions you can ask: – Does your service come with a guarantee? – Do you offer follow-up inspections after completing work?

While it’s tempting to choose the lowest bidder, remember that quality often correlates with price in professional services like mold remediation. Obtain multiple quotes but focus on value rather than cost alone: – Are they using high-quality equipment? – Do they offer comprehensive solutions addressing both symptoms (mold) and causes (moisture)?

Avoid companies that provide vague estimates without detailing what’s included in their pricing structure.

Choosing the right partner ensures not only effective cleanup but also safeguards your home’s air quality and structural integrity over time through preventative measures.

Key Insights Into Effective Mold Removal and Prevention Techniques

Mold growth can pose serious risks to both your property and health. Understanding effective mold removal and prevention techniques is crucial for maintaining a safe and healthy environment. Below are essential insights into removing existing mold and preventing its recurrence.

Identifying the Source of Moisture

Mold thrives in damp conditions, making it critical to identify and address sources of moisture.

  • Leaking pipes: Check under sinks, behind appliances, or within walls for hidden leaks.
  • Condensation: Ensure proper ventilation in areas prone to temperature fluctuations.
  • Roof leaks: Inspect your roof for damage that may be allowing water to seep in.
  • High humidity levels: Maintain indoor humidity levels between 30%–50%.

Addressing the moisture source is the first step before tackling mold removal.

Effective Mold Removal Techniques

If you have identified mold, it’s crucial to act promptly and use appropriate methods for removal based on the severity of the infestation.

  1. Use a mixture of water and detergent or a commercial mold cleaner.
  2. Scrub surfaces with nonporous materials like tiles or glass using a stiff brush.
  3. Wear protective gear, including gloves, goggles, and an N95 mask.
  4. Hire professional remediation services to ensure thorough cleaning.
  5. Professionals use specialized equipment like HEPA vacuums, air scrubbers, and sealing techniques.
  6. Porous materials:
    Mold on porous items like drywall or carpets often cannot be fully cleaned:
  7. Dispose of heavily infested materials safely.
  8. Replace items such as insulation or ceiling tiles when necessary.

Preventing Future Mold Growth

Maintain Proper Ventilation
  • Use exhaust fans in kitchens, bathrooms, and laundry rooms.
  • Open windows when cooking or showering to improve airflow.
  • Ensure HVAC systems are well-maintained with clean filters.
Control Indoor Humidity
  • Use dehumidifiers in basements or other damp areas.
  • Install hygrometers to monitor humidity levels regularly.
Routine Inspections

Conduct regular inspections of areas prone to moisture: – Check around plumbing fixtures for leaks or condensation buildup. – Inspect attics and crawl spaces for signs of water intrusion.

Waterproofing Measures

Seal gaps around windows, doors, and foundations effectively. Waterproof basement walls if needed using sealants designed specifically for such purposes.

Comparing DIY vs Professional Assistance

Aspect DIY Mold Removal Professional Remediation
Cost Low initial cost Higher upfront investment
Equipment Required Basic cleaning supplies Specialized tools & technologies
Effectiveness Limited scope Comprehensive & thorough solutions
Health Risks Higher risk if not handled properly Reduces exposure through trained experts

For minor cases, DIY methods may suffice; however, professional help ensures a safer environment for extensive infestations or health-sensitive situations.

By combining proper identification techniques with preventative measures outlined above, homeowners can significantly reduce the likelihood of recurring mold issues while safeguarding indoor air quality.

Important Strategies for Protecting Your Home from Harmful Mold Growth

To mitigate the risks associated with mold, implementing effective strategies for prevention and removal is essential. Below are detailed approaches to safeguard your home from harmful mold growth.

Before addressing mold prevention, it’s important to understand what causes mold to thrive.

  • Moisture: Excessive moisture or humidity levels create an environment conducive to mold growth.
  • Poor Ventilation: Areas with limited airflow, such as basements or attics, are more likely to develop mold issues.
  • Organic Materials: Mold feeds on organic materials like wood, drywall, and carpet fibers.
  • Leaks: Plumbing leaks or roof leaks provide a continuous water source that encourages mold proliferation.

Moisture Management Strategies

  1. Fix Leaks Promptly: Inspect plumbing fixtures, roofs, and windows regularly for signs of leakage and address them immediately.
  2. Use Dehumidifiers: Maintain indoor humidity levels below 50% using dehumidifiers in areas prone to excess moisture.
  3. Seal Vulnerable Areas: Ensure that windows, door frames, and basement walls are properly sealed to prevent water intrusion.

Regular Maintenance Checks

  • Conduct annual inspections of your roof and foundation for cracks or potential entry points for water.
  • Clear gutters regularly to avoid water accumulation near your home’s foundation.
  • Inspect HVAC systems for blockages or leaks that could contribute to damp conditions.

Mold Prevention Through Proper Cleaning Practices

  • Use Mold-Inhibiting Products:Clean surfaces prone to dampness (e. g. , bathroom tiles) with products designed to prevent fungal growth.
  • Avoid Carpet in High-Moisture Areas:Opt for tile or linoleum flooring instead of carpet in areas like bathrooms or basements.
  • Dry Wet Items Immediately:Towels, sponges, and clothing should be dried promptly after use.

Table: Signs That Your Home May Have Mold Issues

Sign Description Action Required
Musty Odor Persistent earthy smell Investigate hidden areas (walls/flooring)
Water Stains Discolored spots on walls/ceilings Check for leaks behind affected surfaces
Health Symptoms Allergies worsen at home (sneezing/coughing) Consult a professional inspector
Visible Growth Black/green spots on visible surfaces Remove immediately using appropriate methods

When Professional Help is Necessary

In cases where mold has already spread extensively or poses health risks (e. g. , black mold), consulting professionals is critical. Certified remediation specialists have the tools and expertise necessary to assess damage accurately and implement comprehensive removal strategies while preventing future occurrences.

By taking these steps seriously and incorporating ongoing prevention measures into your home’s upkeep routine, you can protect your living spaces from harmful mold growth effectively.

Spray bottle and sponge near black mould wall stock photo

Important Strategies for Protecting Your Home from Harmful Mold Growth

It thrives in environments with excess moisture, spreading quickly if left unchecked. To protect your home from harmful mold growth, it’s crucial to implement effective strategies. This guide will help you understand the best practices for keeping mold at bay.

Effective Solutions for Black Mold Removal Jacksonville, FL

The first step to preventing mold is identifying areas where it could thrive.

  • Bathrooms: High humidity and frequent water usage make this a prime location for mold.
  • Kitchens: Leaking sinks, steam from cooking, and damp areas can contribute to growth.
  • Basements: Poor ventilation and groundwater seepage often lead to moisture accumulation.
  • Attics: Improper insulation or roof leaks create ideal conditions for mold development.

Perform regular inspections of these areas to catch potential issues early.

Since mold requires moisture to grow, controlling humidity levels is key.

  1. Maintain indoor humidity levels between 30%–50%. Use a hygrometer to monitor this consistently.
  2. Employ dehumidifiers in particularly damp rooms like basements or laundry spaces.
  3. Repair leaks promptly—this includes plumbing, roofs, walls, and windows.
  4. Ensure proper drainage around the foundation of your home by cleaning gutters regularly.

Additionally, dry wet surfaces (spills, condensation on windows) immediately before they become a breeding ground for fungus.

Improve Ventilation

Proper airflow prevents stagnation and reduces the chances of dampness accumulating indoors.

  • Open doors and windows when weather permits.
  • Ensure HVAC systems are clean and functioning properly.
  • Arrange furniture away from walls to allow air circulation behind them.

Good airflow inhibits the accumulation of moisture that encourages mold growth.

Area Recommended Material Examples
Walls & Ceilings Mold-resistant drywall or paint
Flooring Nonporous materials like tile or vinyl
Insulation Fiberglass insulation with mold inhibitors

These products provide an additional layer of protection against unwanted fungal problems.

Clean Regularly with Anti-Mold Solutions

Keeping surfaces clean is one of the simplest yet most effective ways to deter spores from settling in damp areas.

  • Bathroom tiles
  • Kitchen counters
  • Windowsills
  • Basement floors

For DIY solutions, mix vinegar or baking soda with water to create natural cleaning agents that combat mold spores without harsh chemicals.

Detecting even small patches early can prevent larger outbreaks later on.

  1. Musty odors lingering in a particular area.
  2. Discoloration (green/black spots) appearing on walls or ceilings.
  3. Recurring condensation issues despite ventilation efforts.

Address these indicators immediately by identifying the source and taking corrective action such as drying out affected areas or consulting professionals if necessary.

By following these strategies consistently across all susceptible areas within your home environment—while remaining proactive—you’ll significantly reduce both short-term inconvenience caused by visible fungus outbreaks as well long-term risks associated w/ structural damage likely arising overtime unchecked cases.


January 27, 2026 | Jennifer Hughes

Effective Jacksonville, FL Mold Remediation: Identifying and Addressing Problem Areas in Your Home

Human found mold on wall , in your residential building after renovation stock photo

Mold thrives in environments where moisture is present and airflow is restricted. To effectively prevent mold growth, it is essential to identify and address potential problem areas within your home. This proactive approach can save you from costly repairs and protect the health of your household. Below is a comprehensive guide to help you locate and mitigate these issues.

Common Problem Areas Prone to Mold Growth

Certain areas of your home are more susceptible to mold due to consistent exposure to moisture or inadequate ventilation.

  • Bathrooms: Steam from showers and bathtubs can create excessive humidity, especially when proper ventilation isn’t available.
  • Kitchens: Cooking, dishwashing, and leaking pipes often introduce moisture into the environment.
  • Basements: Poor insulation, leaking foundations, or high humidity levels make basements a common site for mold growth.
  • Attics: Roof leaks or inadequate ventilation can lead to condensation buildup.
  • Windowsills: Condensation on windows can accumulate over time, creating an ideal environment for mold.

Steps to Identify Problem Areas

  1. Conduct a Visual Inspection
    Examine walls, ceilings, baseboards, corners, and hidden spaces for any visible signs of mold. These might include discoloration (greenish-black patches), warping surfaces, or peeling paint.
  2. Monitor Humidity Levels
    High indoor humidity (above 60%) encourages mold growth. Use a hygrometer to measure humidity levels in various rooms of your house.
  3. Detect Water Leaks Early
    Leaking pipes under sinks or dripping faucets may not always be obvious but could contribute significantly to moisture problems.
  4. Look for Musty Odors
    A persistent musty smell often indicates hidden mold growth in less visible areas like behind walls or under carpets.
  5. Inspect HVAC Systems
    Check air ducts and filters as they can harbor dust and moisture that support mold spores.

How to Address Identified Issues

Problem Area Solution
Leaky Pipes Fix leaks immediately using professional plumbing services.
Poor Ventilation Install exhaust fans in bathrooms and kitchens where needed.
High Humidity Use dehumidifiers to maintain optimal indoor humidity levels (30%-50%).
Window Condensation Apply weatherproof seals or double-glazed windows if necessary.

Additional Tips for Mold Prevention

  1. Improve Drainage Around the Home:Ensure gutters are cleaned regularly so rainwater flows away from the foundation instead of pooling around it.
  2. Limit Moisture-Producing Activities:Cover pots when cooking and dry clothes outside rather than indoors when possible.
  3. Seal Cracks in Walls or Foundations:Use silicone-based sealants for long-lasting protection against water infiltration.
  4. Schedule Routine Maintenance:Regularly inspect roofing systems for leaks as well as HVAC systems for cleanliness.

By identifying potential problem areas early on and taking appropriate steps, you can significantly reduce the likelihood of mold thriving in your home while maintaining a safe living environment for you and your family.

Effective Mold Prevention and Long-Term Protection with a Mold Removal Company in Jacksonville, FL

By identifying and addressing sources of moisture in your home, you can create an environment that inhibits mold development and protects your space from long-term damage.

How to Address Excess Moisture with Black Mold Removal Jacksonville, FL

Mold needs three key elements to grow: organic material, a suitable temperature range, and moisture. While organic materials like wood, drywall, or fabrics are common in homes, mold cannot thrive without sustained dampness. Excess humidity or water accumulation provides the perfect breeding ground for mold colonies to form and spread.

Effective Mold Removal Services Jacksonville, FL for Moisture Issues

To effectively control indoor moisture levels, it is essential to identify potential problem areas.

  • Leaky Pipes:Even small drips from piping can create persistent wet spots where mold can grow over time.
  • Roof Leaks:Water infiltration through damaged roofs often leads to hidden mold growth in attics and ceilings.
  • Poor Ventilation:Inadequate airflow can trap humidity indoors, particularly in bathrooms, kitchens, basements, or laundry rooms.
  • Condensation:Temperature differences between indoor air and surfaces (e. g. , windows or walls) may result in condensation buildup.
  • Flooding:Surfaces that remain wet after flooding pose a high risk for mold if not dried properly.
  • High Indoor Humidity Levels:Humidity levels consistently above 50% encourage mold spores to germinate.

By addressing these sources at their root cause, homeowners can significantly reduce the chances of dealing with persistent or hidden mold issues.

Steps for Effective Moisture Control

  1. Fix dripping faucets and plumbing as soon as possible.
  2. Inspect roofing materials regularly for wear or damage that could cause leaks.
  3. Open windows periodically to allow fresh air circulation (weather permitting).
  4. Install portable dehumidifiers in high-humidity areas such as basements.
  5. Consider investing in a whole-house dehumidification system for consistent results (see more under tankless systems).
  6. Apply caulking around windowsills and doors where drafts occur.
  7. Ensure foundations are properly sealed against groundwater intrusion.
  8. Use a hygrometer to measure relative humidity indoors. Aim for levels between 30%–50%.
  9. Clean up spills immediately before they soak into flooring or furniture.
  10. After flooding incidents, remove soaked items like carpets promptly for drying or replacement.
Source Solution
Leaky Pipes Repair plumbing issues quickly
Roof Leaks Inspect & maintain roofing
Poor Ventilation Add fans or open vents/windows
High Indoor Humidity Use dehumidifiers; monitor levels
Condensation Insulate surfaces; improve airflow

Benefits of Moisture Management

Focusing on proactive measures helps ensure your home stays not only dry but also healthy for everyone living inside it.

The Importance of Installing a Tankless Dehumidification System for Mold Control

Installing a tankless dehumidification system is a modern and efficient solution for maintaining optimal indoor humidity levels and safeguarding your home from the risks associated with mold. Below, we explore the importance of these systems, their benefits, and how they contribute to effective mold control.

Why Choose a Tankless Dehumidification System?

Tankless dehumidification systems differ from their traditional counterparts because they do not rely on water collection tanks. Instead, they remove excess moisture by continuously draining water through an external line.

  • Continuous Operation: Unlike tank-based models that stop functioning when the tank is full, tankless systems provide uninterrupted moisture removal.
  • Low Maintenance: With no tanks to empty, homeowners save time and effort while ensuring consistent performance.
  • Compact Design: These systems are typically smaller and easier to integrate into existing HVAC systems or tight spaces.
  • Energy Efficiency: Many tankless models are designed with energy efficiency in mind, helping reduce electricity costs while effectively managing indoor humidity.

How Does a Tankless Dehumidifier Help Prevent Mold?

  1. Reducing Indoor Humidity Levels
    Mold begins to grow in environments where relative humidity exceeds 60%.
  2. Preventing Moisture Accumulation on Surfaces
    High humidity can lead to condensation on walls, windows, and ceilings—ideal conditions for mold development. A continuous-use dehumidifier ensures moisture does not accumulate.
  3. Improving Air Quality
    Excess moisture can also promote musty odors and the proliferation of allergens like dust mites. Removing this moisture improves overall air quality while protecting against health issues caused by mold exposure.

Features to Look For When Selecting a Tankless Dehumidifier

Feature Purpose
Capacity (Pints Per Day) Determines how much moisture can be removed daily; choose based on room size.
Energy Star Certification Ensures energy-efficient operation to minimize utility costs.
Integrated Drainage System Allows for continuous drainage without manual intervention.
Automatic Humidity Controls Monitors and adjusts humidity levels automatically for convenience.
Quiet Operation Ideal for bedrooms or living areas where noise may be disruptive.

Installation Considerations

  • Position it near the most affected areas, such as basements or bathrooms prone to dampness.
  • Ensure proper drainage setup to prevent leaks or water pooling.
  • Pair it with regular home maintenance practices like sealing leaks and using exhaust fans in kitchens or bathrooms.

By integrating a high-quality tankless dehumidifier into your home’s environment, you can achieve long-term protection against mold growth while improving comfort and air quality throughout your living space.

Human found mold on wall , in your residential building after renovation stock photo

Effective Cleaning Techniques with Products Designed to Prohibit Mold Growth

Mold can be a persistent and harmful issue, but the right cleaning techniques combined with effective products can help you tackle it efficiently. Here’s a guide on how to clean mold-prone areas in your home while using products designed specifically to inhibit mold growth.

Step 1: Assess the Affected Area

Before diving into cleaning, identify the size and severity of the mold problem. This will help you determine whether it’s manageable on your own or if professional assistance is necessary.

  • Small area (less than 10 square feet):Homeowners can usually manage this themselves with proper tools and products.
  • Larger infestations (over 10 square feet):Consider hiring a professional as larger colonies may indicate underlying structural or moisture issues.

Step 2: Gather Necessary Supplies

Using the right cleaning supplies is essential for effective mold removal and prevention.

Tools Purpose
Microfiber cloths Capture spores without spreading them further
HEPA vacuum Trap airborne mold spores during cleanup
Soft-bristle brush Scrub surfaces without causing damage
Protective gear (gloves, mask, goggles) Prevent exposure to harmful spores


Cleaning Products Purpose
Mold-specific cleaners (EPA-certified) Kill existing mold and prevent regrowth
White vinegar (natural alternative) Mild acid effective against light molds
Hydrogen peroxide Disinfectant for porous surfaces
Baking soda Gentle abrasive that absorbs moisture

Step 3: Techniques for Cleaning Different Surfaces

Each surface in your home requires a tailored approach to ensure effective mold removal without causing damage.

  1. Use an EPA-registered cleaner or white vinegar mixed with water.
  2. Wipe down non-porous materials such as tiles, glass, or countertops with a microfiber cloth.
  3. Scrub stubborn spots gently with a soft-bristle brush if needed.
    • Apply hydrogen peroxide directly onto the area.
    • Let it sit for at least 10 minutes before wiping away.
    • If damage persists, consider replacing the material entirely as some molds penetrate deeply into porous surfaces.
  4. Treat small patches of mold using baking soda paste followed by vacuuming with a HEPA vacuum.
  5. Replace heavily infested carpets or consult professionals for deep-clean treatments.

Step 4: Preventative Maintenance After Cleaning

  • Ensure all cleaned areas are completely dry before restoring furniture or décor.
  • Use preventive sprays that create an antimicrobial barrier on surfaces prone to dampness.
  • Implement regular cleaning routines in high-moisture zones like bathrooms and basements.

Additional Tips for Long-Term Prevention

  • Invest in air purifiers equipped with HEPA filters to reduce airborne spores.
  • Regularly inspect plumbing fixtures for leaks that could lead to excess moisture.
  • Seal cracks in walls or around windows where water infiltration may occur.

By following these best practices and utilizing reliable products designed to combat mold growth, you’ll create a healthier living environment while minimizing potential risks associated with recurring infestations.

Effective Cleaning Techniques with Products Designed to Prohibit Mold Growth

Maintaining a healthy, mold-free home requires a proactive approach, especially when it comes to cleaning. Using the right techniques and products can help ensure that mold spores do not take hold and spread. Below, we’ll explore some effective cleaning methods and highlight specific products designed to combat mold growth.

Use Mold-Specific Cleaning Agents

Mold-specific cleaning agents are formulated to eliminate mold spores and inhibit their regrowth. When selecting a product, look for those labeled as either “fungicidal” or “mold inhibitors.

  • Hydrogen Peroxide (3%): A safer alternative to bleach, hydrogen peroxide kills mold without emitting toxic fumes. It is especially effective on porous surfaces like wood and drywall.
  • Concrobium Mold Control: A non-toxic product that eliminates existing mold while forming an invisible barrier against future growth.
  • White Vinegar: An inexpensive natural option with mild antimicrobial properties. Though not as strong as commercial cleaners, it works well for light mold issues.

Always follow product instructions carefully to ensure effectiveness.

Focus on High-Risk Areas

Certain areas in your home are more prone to moisture buildup and mold formation.

  1. Scrub tiles, grout lines, and shower curtains weekly with an antifungal cleaner.
  2. Wipe down wet surfaces after showers or baths using a microfiber cloth.
  3. Clean around sinks, under cabinets near plumbing, and inside refrigerators where condensation often forms.
  4. Remove food spills immediately to discourage mold-friendly conditions.
  5. Mop or vacuum up any standing water promptly.
  6. Treat concrete walls or floors with a solution containing anti-mold additives.

Proper Cleaning Techniques

  • Wear personal protective equipment (PPE), such as gloves, goggles, and a mask rated for particulate filtration (e. g. , N95).
  • Use disposable cleaning cloths or sponges that you can discard after use.
  • Avoid dry brushing or scraping off the mold directly – this can release spores into the air.
  • After removing visible spots of mold using an appropriate cleaner, rinse thoroughly with clean water and allow the surface to dry completely.

Preventative Strategies During Cleaning

Strategy Description
Microfiber Cloths & Mops These trap more particles than traditional materials and reduce the spread of spores.
HEPA Filters in Vacuums Vacuums equipped with HEPA filters capture airborne spores while minimizing redistribution.
Regular Dusting Dust harbors organic particles that feed mold; clean surfaces frequently with damp cloths.

Disinfect After Flooding or Water Damage

  1. Remove all wet materials promptly (e. g. , furniture, carpeting).
  2. Wash hard surfaces like walls and floors using a bleach-water mixture (1 cup bleach per gallon of water) while ensuring proper ventilation in the area.
  3. Dry all cleaned surfaces thoroughly using fans or dehumidifiers within 24–48 hours.

Adopting these practical cleaning methods alongside targeted products will help create an environment hostile to fungal development while maintaining hygiene throughout your living spaces consistently over time.


January 27, 2026 | Jennifer Hughes

A Complete Guide to Choosing the Best Mold Removal Company Jacksonville, FL

Person Hand Wearing Gloves Measuring Wetness stock photo

Mold growth is a common concern for homeowners, as it not only damages property but can also pose significant health risks. Implementing proactive measures to prevent mold in your home is essential. This guide provides practical steps and tips to help you keep your living spaces mold-free.

Why Mold Prevention Matters

Mold thrives in damp, humid environments, and it can spread quickly under the right conditions. Beyond causing structural damage, mold exposure can lead to respiratory issues, allergies, and other health problems. By addressing potential causes early on, you can save time, money, and ensure a healthier home environment.

Key Steps to Prevent Mold at Home

  1. Keep indoor humidity levels between 30% and 50%.
  2. Use a hygrometer (humidity monitor) to track moisture levels in your home.
  3. Invest in dehumidifiers for high-moisture areas like basements or bathrooms.
  4. Ensure proper air circulation by opening windows when weather permits.
  5. Use exhaust fans in kitchens and bathrooms during and after activities that produce steam (e. g. , cooking or showering).
  6. Consider installing advanced ventilation systems for continuous airflow.
  7. Inspect plumbing regularly for leaks under sinks or around appliances like dishwashers and washing machines.
  8. Repair roof leaks as soon as they are noticed, especially after heavy rainfall.
  9. Dry wet areas immediately—mop up spills and dry carpets thoroughly after cleaning them.
  10. Avoid leaving wet clothes in the washing machine or laundry baskets for extended periods.
  11. When renovating or building your home, opt for mold-resistant drywall or paint.
  12. Choose waterproof materials for areas prone to moisture exposure (e. g. , bathrooms).
  13. Replace HVAC filters regularly to reduce dust accumulation that fosters mold growth.
  14. Schedule maintenance to ensure ducts are clean and free of blockages.

Common Areas Prone to Mold

Area Risk Factors Prevention Tips
Basement High humidity, water leaks Use dehumidifiers; seal foundation cracks
Bathroom Steam from showers Install exhaust fans; use mildew-resistant shower curtains
Kitchen Cooking steam; water splashes Ventilate while cooking; fix sink leaks
Laundry Room Dryer exhaust; wet clothes Ensure dryer vents outside; avoid damp piles of clothing
Attic Roof leaks; poor ventilation Inspect roof regularly; install attic vents

Maintenance Checklist

To maintain a mold-free home year-round: – Inspect gutters regularly and clear any blockages that may cause water overflow. – Clean air conditioning drip pans often. – Check seals around windows and doors for condensation buildup. – Wash shower curtains frequently with hot water.

Proactive measures make all the difference when it comes to mold prevention. By following these guidelines consistently, you can effectively safeguard your home from this unwelcome problem while promoting healthier indoor air quality for you and your family.

Understanding Jacksonville, FL Mold Remediation: The Critical 24-48 Hour Window After Water Damage

When water damage occurs, whether due to flooding, leaks, or plumbing issues, it creates a prime environment for mold growth. Mold spores are naturally present in the air and on surfaces, but they require moisture to grow. Once water damage occurs, mold can start growing within 24 to 48 hours if proper actions aren’t taken. Understanding and acting within this critical window is essential to minimize health risks and prevent costly property damage.

Why the 24-48 Hour Window Matters

Mold thrives in damp environments.

  • Rapid Growth Cycle: Mold spores germinate within hours of exposure to moisture. Delaying action allows colonies to take hold.
  • Health Risks: Mold exposure can aggravate allergies and asthma or cause respiratory issues, particularly for individuals with compromised immune systems.
  • Structural Damage: Once mold infiltrates porous materials like drywall or wood, remediation becomes more challenging and costly.

Key Steps for Addressing Water Damage Quickly

  1. Identify affected areas and materials.
  2. Check hidden spaces like behind walls or under flooring where moisture can linger.
  3. Use pumps or wet/dry vacuums to extract standing water.
  4. Ensure drains are functioning properly during cleanup.
  5. Use fans or industrial-grade air movers to increase airflow.
  6. Dehumidifiers are highly effective at reducing moisture levels in the air.
  7. Open windows when weather permits for additional ventilation.
  8. Remove soaked porous materials such as carpeting, insulation, or ceiling tiles if they cannot be dried quickly.
  9. Hard surfaces like tiles can be sanitized but must still be dried promptly.
  10. Clean hard surfaces with a solution of bleach (1 cup per gallon of water) or specialized antimicrobial products designed for mold prevention.
  11. Wear gloves and masks during cleanup to avoid inhaling spores.
Material Susceptibility to Mold Recommended Action After Exposure
Drywall High Replace if heavily saturated
Wood Moderate Dry thoroughly; sand if necessary
Carpet High Remove if not fully dry within 48 hrs
Concrete Low Clean thoroughly; ensure dry conditions
Upholstery High Clean professionally or discard

Tools Needed for Effective Mold Prevention After Water Damage

  • Wet/dry vacuum
  • Dehumidifier
  • Industrial-grade fans
  • Moisture meter (to measure dampness levels)
  • Protective equipment (gloves, masks, goggles)

When Should You Call a Professional?

If large areas are affected by water damage (more than 10 square feet) or you suspect hidden mold growth due to lingering odors or discoloration on walls/floors, it’s best to contact a certified mold remediation expert immediately. Professionals have access to specialized equipment such as infrared cameras and industrial dehumidifiers that ensure thorough drying.

By acting quickly during this critical period after water damage occurs, homeowners can significantly reduce the likelihood of extensive mold problems while safeguarding both health and property value.

Understanding the Importance of Black Mold Removal Jacksonville, FL After Water Damage

When it comes to mold prevention and remediation, timing is everything. After water damage occurs, there is a short but crucial window—typically 24 to 48 hours—during which swift action can prevent mold growth from taking hold. Understanding why this timeframe matters and the steps homeowners should take within this period can save time, money, and potential health risks.

Why the 24-48 Hour Window is Critical

Mold spores are naturally present in the air and on surfaces in most indoor environments. When excess moisture is introduced due to events like flooding, pipe leaks, or roof damage, these spores find an ideal environment to grow.

  • Moist conditions: Humidity levels above 60% create favorable conditions for mold.
  • Organic materials: Common household items such as drywall, wood, carpeting, and upholstery provide nutrients for mold growth.
  • Temperatures between 70°F and 90°F: These temperatures align with typical indoor climates.

If moisture is not addressed within 24-48 hours after water exposure, spores begin to colonize surfaces rapidly. Once active growth begins, removing mold becomes significantly more challenging and costly.

Immediate Steps to Take After Water Damage

  1. Use pumps or wet-dry vacuums to extract standing water from affected areas.
  2. Mop or blot smaller areas of moisture using absorbent cloths or towels.
  3. Increase airflow by opening windows and doors if weather permits.
  4. Use fans and dehumidifiers to reduce humidity levels.
  5. If carpets or rugs are wet, remove them promptly for separate drying.
  6. Check under furniture, behind baseboards, inside wall cavities, and other less obvious areas where water may have seeped.
  7. Use a moisture meter if available to identify damp spots that are not visible.
  8. Remove porous items like saturated drywall panels or insulation that cannot be dried thoroughly.
  9. Dispose of any upholstered furniture or carpeting that remains wet after 48 hours.
  10. Clean hard surfaces with a mixture of detergent and water followed by disinfectants such as diluted bleach (1 cup bleach per gallon of water). Ensure proper ventilation when using chemical cleaning agents.

Table: Essential Tools for Mold Prevention Post-Water Damage

Tool/Equipment Purpose Example Brands/Models
Wet-dry vacuum Removes standing water Shop-Vac®, DeWalt®
Dehumidifier Reduces indoor humidity Frigidaire High-Efficiency Dehumidifier
Moisture meter Detects hidden moisture General Tools MMD4E Digital Moisture Meter
Fans Enhances airflow Lasko High Velocity Blower Fan
Cleaning agents Disinfects surfaces Clorox® Bleach Cleaner

When Professional Help May Be Necessary

If you cannot address water damage fully within the first two days or notice signs of potential mold (e. g. , musty odors or discoloration), contacting a certified professional is advisable. Professionals have access to industrial-strength drying equipment and advanced tools like infrared imaging cameras that detect trapped moisture beneath floors or behind walls.

By taking immediate action during the critical 24–48 hour window following water damage—and knowing when it’s time to call experts—you can effectively minimize your risk of mold growth while protecting your home’s structural integrity and your family’s well-being.

Disinfection of mold. A hand with a spatula removes the black fungus from the white wall. Aspergillus."n stock photo

Effective Mold Removal Services Jacksonville, FL: Signs You Need Professional Help

Early detection of mold growth is essential to prevent further damage to your property and safeguard your health. While small amounts of mold in areas like bathrooms or kitchens might be manageable for homeowners, there are specific signs that indicate the need for immediate action from a professional remediation service. Below are key indicators that mold may have become a serious issue in your home.

One of the earliest signs of mold is a strong, musty odor that doesn’t dissipate, even with ventilation. Unlike temporary smells caused by humidity or cleaning products, this odor signals active mold growth hidden behind walls, under floors, or within HVAC systems.

While small spots on surfaces like grout can often be cleaned with household solutions, extensive or recurring mold patches indicate an underlying problem.
– Mold appearing on non-porous surfaces like walls and ceilings
– Recurring black, green, or white spots after cleaning
– Growth in unexpected areas such as baseboards or wooden furniture

Table: Common Visible Mold Types

Type Color Common Locations
Black Mold (Stachybotrys chartarum) Black/Dark Green Walls, ceilings, damp wood
White Mold White/Gray Basement walls, drywall
Green Mold Bright Green Wood surfaces, carpets

If you notice water stains or discoloration on walls or ceilings—often yellow or brownish—it could signal leaks that are creating ideal conditions for mold growth behind the surface.

Key areas to inspect include:
– Areas near windows and doors due to seepage issues
– Ceiling corners where leaks might occur from faulty roofing
– Spaces below plumbing fixtures such as sinks and tubs

Unexplained health symptoms can be an indirect sign of hidden mold in your home.
– Coughing and sneezing
– Persistent headaches
– Watery eyes or skin irritation

If these symptoms improve when leaving your home for extended periods but worsen upon return, it’s critical to consult professionals for an inspection.

Mold weakens materials over time—especially wood—which can lead to structural damage throughout your home if ignored.
– Warped hardwood floors
– Crumbling drywall
– Sagging ceilings

These issues not only compromise safety but also escalate repair costs significantly.

Why Professional Remediation Is Crucial

Attempting DIY solutions for significant infestations often spreads spores further without addressing root causes like moisture intrusion. Professionals use specialized tools such as moisture meters and infrared cameras to identify hidden growth zones effectively while ensuring containment protocols prevent cross-contamination.

Additionally: 1.Certified technicians use EPA-approved solutions safe for human health during remediation. 2. Advanced techniques like negative air pressure contain airborne spores. 3. Post-removal testing ensures long-term safety once remediation is complete.

Addressing these warning signs promptly ensures minimal disruption while preserving both property value and indoor air quality effectively over time.

Signs of Mold That Require Immediate Professional Attention and Remediation

Mold growth in your home is not only unsightly but can also pose significant health risks and structural damage if left untreated. While some minor mold issues can be managed with DIY methods, certain signs demand immediate professional attention to ensure the safety of your household and prevent further damage. Below are key indicators that signal the need for expert remediation.

A strong, musty smell that lingers in specific areas of your home is often a clear sign of mold presence. This odor typically emanates from hidden mold colonies growing behind walls, under carpets, or in crawl spaces.

Action Needed:If you cannot locate the source of the odor or it persists despite thorough cleaning, consult a mold remediation professional for a detailed inspection.

Mold may appear as black spots, green patches, or fuzzy white growth on surfaces such as walls, ceilings, and furniture. The presence of large patches (over 10 square feet) requires professional intervention.

Why Call a Professional?
– Large infestations indicate underlying water issues or widespread contamination.
– Professionals can detect hidden mold beyond what is visible on surfaces.

Unexplained respiratory problems, allergies, persistent coughing, sneezing, skin irritation, or worsening asthma symptoms among household members might be linked to mold exposure.

When to Act:If symptoms improve when leaving the home but return upon re-entry, this could suggest indoor mold as the culprit.

Water stains on walls and ceilings signal potential moisture buildup behind surfaces—an ideal environment for mold growth. Peeling paint or warped drywall can also hint at underlying problems.

Common Water-Damaged Areas Risk Level
Under sinks High
Basement walls High
Around windowsills Moderate

Next Steps:A professional inspection can determine if water damage has led to hidden mold growth.

If you’ve cleaned up visible mold only for it to return within days or weeks, this indicates an unresolved issue contributing to ongoing growth—such as high humidity levels or hidden leaks.

Why DIY Isn’t Enough Here:Without addressing root causes like moisture control or poor ventilation systems, recurring outbreaks are inevitable and require expert evaluation.

Black mold is particularly dangerous due to its potential toxicity. Although not all black-colored mold types are toxic molds like Stachybotrys chartarum specifically release mycotoxins that may cause severe health effects with prolonged exposure.

Key Considerations:Never try to remove suspected toxic black mold yourself; improper handling could spread spores throughout your home and worsen contamination risks.

What Professionals Can Do for You

  • Comprehensive Inspection:Experts use advanced tools like infrared cameras and moisture meters to detect hidden sources of moisture and concealed colonies.
  • Safety Measures:Professionals establish containment zones during remediation to prevent spore spread.
  • Moisture Mitigation:They address water leaks and implement solutions like dehumidification systems.
  • Thorough Cleaning & Removal:Specialized equipment such as HEPA vacuums ensures complete removal.
  • Post-Treatment Testing:Air quality tests confirm successful remediation efforts before declaring your space safe again.

Recognizing these warning signs early on allows you to take proactive steps toward securing a healthy living environment while protecting your property’s structure from long-term damage caused by unchecked mold outbreaks.

Advanced Ventilation System Components to Reduce Mold Risk in Your Home

Proper ventilation plays a crucial role in maintaining a healthy indoor environment and preventing mold growth. By understanding and implementing advanced ventilation system components, homeowners can significantly reduce the risk of mold development. Below is a detailed overview of key components and strategies to enhance your ventilation system for mold prevention.

Key Components of an Advanced Ventilation System

  1. ERVs improve indoor air quality by exchanging stale indoor air with fresh outdoor air while maintaining temperature and humidity balance.
  2. Helps control excess moisture, which is a primary factor for mold growth.
  3. Ideal for reducing condensation on windows and walls.
  4. High-performance exhaust fans in high-moisture areas, such as bathrooms, kitchens, and laundry rooms, prevent damp conditions conducive to mold growth.
  5. Ensure fans are vented directly outside rather than into attics or crawl spaces.
  6. These systems ensure consistent airflow throughout the entire home by integrating with HVAC systems or operating independently.
  7. Balanced airflow dilutes indoor pollutants and prevents stagnant moist air.
  8. Equipped with dehumidifiers or cooling coils that regulate humidity levels while improving overall airflow quality.

Best Practices for Ensuring Effective Ventilation

  • Conduct Regular Maintenance:Clean ducts and vents periodically to prevent dust buildup or microbial growth.
  • Seal Duct Leaks:Air leaks in ductwork can introduce moisture into unwanted areas like walls or attics.
  • Use Smart Controls:Install programmable thermostats or humidity sensors to monitor and adjust settings efficiently.
  • Increase Natural Ventilation:Open windows when weather permits to allow fresh outdoor air circulation.
  • Ensure Proper Placement of Vents:Avoid placing vents near damp areas where moisture can accumulate unnoticed.

Comparison: Basic vs Advanced Systems

Feature Basic System Advanced System
Type of Ventilation Exhaust-only Balanced/Integrated
Moisture Control Limited Comprehensive
Filtration Capabilities Minimal HEPA/Advanced Filtration
Energy Efficiency Moderate High
Application Area Single Room Whole House

The table above highlights how advanced ventilation systems clearly outperform basic setups in combating mold risks effectively over the long term.

Benefits of Investing in an Advanced Solution

  • Prevents excess moisture buildup that promotes fungal spores.
  • Improves overall indoor air quality by removing contaminants like pollen, dust mites, and odors.
  • Enhances comfort through better temperature regulation.
  • Reduces energy costs by optimizing HVAC performance through recovery ventilators.
  • Protects structural elements such as drywall, wood, or insulation from water damage caused by condensation-related issues.

By upgrading your home’s ventilation system with advanced components like ERVs or whole-house setups paired with diligent maintenance routines, you create a robust defense against potential mold problems while ensuring healthier living conditions for everyone in your household.

Exterminator working stock photo

Professional Air Filtration Solutions: HEPA Filters, UV-C Lights, and More for Mold Prevention

Mold growth in your home can lead to serious health issues and structural damage. While regular cleaning and humidity control are essential for preventing mold, professional air filtration solutions offer a more advanced layer of protection by improving indoor air quality and eliminating mold spores before they settle. Below, we explore some of the most effective professional tools such as HEPA filters, UV-C lights, and other technologies that can help keep your home mold-free.

HEPA Filters for Mold Prevention

High-Efficiency Particulate Air (HEPA) filters are designed to capture microscopic particles, including mold spores, allergens, and dust. These filters are particularly effective because they can trap particles as small as 0. 3 microns with an efficiency rate of 99. 97%.

  • Effective Particle Removal: Captures airborne mold spores and prevents them from spreading to other areas of the house.
  • Improves Air Quality: Reduces allergens and pollutants that exacerbate respiratory issues.
  • Durable Components: Many HEPA filtration systems work seamlessly within HVAC systems or standalone air purifiers.

When choosing a HEPA filter system, look for certifications like True HEPA or products specifically designed for mold remediation.

UV-C Light Technology

Ultraviolet-C (UV-C) lights use short-wavelength ultraviolet light to kill mold spores, bacteria, viruses, and other microorganisms present in the air. These systems are often installed within HVAC ducts or combined with air purifiers to target pathogens directly.

  • Disinfection Efficiency: Kills active mold spores instead of just trapping them.
  • Prevention of Mold Reproduction: Damages the DNA structure of microorganisms to prevent further growth.
  • Low Maintenance Requirements: Most systems require only occasional bulb replacements for continued functionality.

It’s worth noting that UV-C lights work best when used alongside other filtration methods since they don’t remove physical particles from the air.

Additional Air Filtration Technologies

  • Absorb odors caused by mold growth.
  • Remove volatile organic compounds (VOCs) from the air.
  • Charge airborne particles so they adhere to collection plates inside the device.
  • Release negative ions into the air that bond with positive ions such as dust or mold spores. These heavier bonded particles then fall out of circulation.
Technology Key Functionality Best Use Case
HEPA Filters Traps airborne particles Homes with high allergen sensitivity
UV-C Lights Kills live microorganisms Preventing active reproduction of molds
Activated Carbon Filters Absorbs odors & VOCs Managing persistent odors
Electrostatic Precipitators Charges & collects airborne particles Homes needing low-energy solutions
Ionizers Bonds ions to reduce airborne debris General improvement in indoor air quality

Choosing the Right Solution

The ideal solution depends on your home’s specific needs. If you live in a region prone to high humidity or have dealt with water damage in the past, combining several technologies—such as HEPA filtering with UV-C lighting—can offer comprehensive protection against potential mold outbreaks.

  1. Consult professionals who specialize in installing advanced ventilation or purification systems tailored specifically for your home’s size and layout.
  2. Conduct regular maintenance on these systems to ensure peak efficiency over time.
  3. Pair these solutions with everyday preventive measures like dehumidifiers and proper ventilation practices.

Investing in professional-grade air filtration not only minimizes health risks but also preserves your living space long-term by reducing opportunities for harmful molds to thrive indoors.

Frequently Asked Questions About Mold Prevention and Professional Help

When it comes to mold prevention and remediation, homeowners often have numerous questions about best practices, professional intervention, and how to ensure their homes remain safe from mold infestations. Below is a comprehensive FAQ section addressing the most common concerns.

What Are the Early Signs of Mold Growth?

Recognizing mold in its early stages can prevent costly repairs and health-related issues.

  • Persistent musty odors.
  • Visible discoloration on walls, ceilings, or floors (often black, green, or white).
  • Increased allergy-like symptoms (sneezing, coughing, watery eyes) that worsen indoors.
  • Peeling or bubbling paint or wallpaper.
  • Excess moisture or condensation on windows and walls.

How Can I Prevent Mold From Developing in the First Place?

Preventing mold growth requires attention to moisture control.

  1. Use exhaust fans in kitchens, bathrooms, and laundry rooms.
  2. Keep windows open when weather permits to improve airflow.
  3. Keep humidity below 50%. Use a hygrometer to monitor levels.
  4. Fix plumbing leaks under sinks or behind walls promptly.
  5. Inspect your roof for damage that could lead to water intrusion.
  6. Basements, attics, and crawl spaces are vulnerable to excess moisture buildup.
  7. Clean air ducts regularly and replace HVAC filters as recommended by the manufacturer.

When Should I Call a Professional for Mold Removal?

  • The affected mold-covered area exceeds 10 square feet.
  • The mold has infiltrated porous materials like drywall or carpeting.
  • You experience persistent respiratory issues while indoors despite cleaning efforts.
  • There is recurring mold growth after attempts at removal.

Professionals bring expertise and specialized tools such as HEPA vacuums and antimicrobial sprays that ensure thorough removal.

What Tools Do Professionals Use for Mold Remediation?

Tool/Equipment Purpose
HEPA Filters Capture 99.97% of airborne mold spores
Air Scrubbers Improve indoor air quality during remediation
Infrared Cameras Detect moisture hiding behind walls or floors
Dehumidifiers Reduce humidity levels during cleanup
Antimicrobial Treatments Prevent regrowth on treated surfaces

These tools not only remove existing mold but also help create an inhospitable environment for future growth.

Is Black Mold More Dangerous Than Other Types?

While all molds can cause health issues when left untreated, “black mold” (Stachybotrys chartarum) often gains attention due to its association with severe respiratory problems in sensitive individuals.

  1. Any type of mold growing indoors should be taken seriously.
  2. Prolonged exposure—especially in people with asthma or weakened immune systems—can exacerbate symptoms regardless of the strain.

Proper identification by professionals may help determine the severity of exposure risks.

Can DIY Methods Effectively Remove Mold?

  1. DIY methods are generally ineffective against deep-seated infestations within porous materials.
  2. Improper handling can disturb spores, causing them to spread further into your home’s environment.

For long-term safety especially in significant cases of contamination hiring licensed professionals remains essential best practice ensuring thorough eradication without secondary risks.


January 27, 2026 | Jennifer Hughes

Effective Jacksonville, FL Mold Remediation: Choosing the Best Dehumidifier for Your Home

Woman in protective suit pointing at wall affected with mold, closeup stock photo

Mold growth is a common problem in spaces with excess moisture. One of the most effective tools to combat this issue is a dehumidifier. Choosing the right dehumidifier can ensure that moisture levels are controlled, reducing the likelihood of mold development. Below are essential considerations and tips to help you select the best dehumidifier for efficient mold removal in your home.

Assess Your Space’s Size and Humidity Levels

  • Small rooms (e.g., bathrooms or closets): Look for compact models designed for areas under 300 square feet.
  • Medium rooms (e.g., bedrooms or offices): Opt for mid-size units that can cover between 300–700 square feet.
  • Large spaces (e.g., basements or living rooms): Choose high-capacity models capable of handling over 1,000 square feet.
  • Humidity above 60% encourages mold growth. A hygrometer can measure your home’s humidity levels, helping you decide whether you need a standard model or a high-performance unit designed for extremely damp conditions.

Choose Between Portable vs. Whole-House Dehumidifiers

Dehumidifiers come in various designs, but they generally fall into two categories: portable and whole-house units.

Feature Portable Dehumidifiers Whole-House Dehumidifiers
Coverage Area Ideal for single rooms Covers entire homes
Installation No installation required Requires professional installation
Cost Affordable upfront cost Higher initial investment
Flexibility Can be moved between rooms Fixed system

For small-scale mold issues confined to specific rooms, portable dehumidifiers are sufficient. For ongoing moisture problems across multiple areas, investing in a whole-house system may be more effective.

Consider Energy Efficiency Features

  • An Energy Star Certification, indicating they meet strict energy efficiency standards.
  • Adjustable humidity controls and timers to avoid unnecessary operation.
  • Auto-shutoff features to prevent over-dehumidification.

Pay Attention to Tank Capacity and Drainage Options

  • Small Tanks (1–2 liters): Require frequent emptying; better suited for light use.
  • Medium Tanks (3–5 liters): Balance convenience and size.
  • Large Tanks (6+ liters): Ideal for consistently humid spaces but may be bulkier.

For continuous operation without manual intervention, look for models with built-in drainage systems that connect directly to your plumbing or allow hose attachments.

Noise Levels Matter, Especially in Living Spaces

If you plan on using a dehumidifier in bedrooms or living areas, consider its noise output. Models designed with low-decibel technology can operate quietly without disrupting daily activities or sleep.

Additional Features That Enhance Efficiency

  • Digital humidistats for precise control of humidity levels.
  • Filters that trap allergens like dust and mold spores.
  • Auto-restart functionality after power interruptions.
  • Compact designs with wheels or handles for easy mobility.

By carefully evaluating these factors, you can choose a high-quality dehumidifier tailored to your home’s specific needs while effectively managing moisture levels to prevent mold growth.

Choosing the Best Mold Removal Company Jacksonville, FL: Tips for Effective Mold Prevention

When it comes to efficient mold removal, understanding the two primary types of dehumidifiers is vital. Mold thrives in damp environments, and selecting the right dehumidifier type can significantly impact your efforts to reduce moisture levels and prevent mold growth effectively.

Efficient Black Mold Removal Jacksonville, FL with Refrigerant Dehumidifiers

Advantages:
High Efficiency for Warmer Climates: These units perform exceptionally well in warm and humid conditions, making them ideal for households located in tropical or subtropical areas.
Reliable for High Moisture Levels: Refrigerant models are effective at removing significant amounts of water from the air, which is crucial for spaces with persistently high humidity.
Affordable Options Available: Many refrigerant dehumidifiers come at varying price points, making them accessible to a broad range of users.

Limitations:
Reduced Effectiveness in Cooler Environments: These units become less efficient when used in colder conditions since their cooling coils may freeze.
Bulky Design and Noise Levels: Some models can be large and produce noticeable noise during operation.

Refrigerant dehumidifiers are best suited for environments where warm temperatures prevail throughout most of the year.

Effective Mold Removal Services in Jacksonville, FL with Desiccant Dehumidifiers

Advantages:
Effective in Cold Conditions: Desiccant models are highly effective even at lower temperatures because they don’t rely on refrigeration processes that may freeze in colder climates.
Compact and Lightweight Design: These units tend to be smaller and more portable compared to refrigerants, making them ideal for smaller spaces like bathrooms or closets. – Quiet Operation: Desiccants typically operate more quietly than their refrigerant counterparts, offering a better experience if used in bedrooms or offices.

Limitations:
Lower Capacity for Large Spaces: Desiccants generally handle smaller volumes of air compared to refrigerants, which means they may not be suitable for large areas with significant moisture issues. – Higher Energy Consumption Over Time: Some models use more energy than refrigerants when operating continuously.

Key Factors for Decision-Making

Feature Refrigerant Dehumidifier Desiccant Dehumidifier
Performance (Warm Climates) Excellent Moderate
Performance (Cold Climates) Poor Excellent
Portability Moderate High
Noise Level Higher Lower
Energy Consumption Lower Higher

Which One Should You Choose?

The decision depends largely on your specific needs:
1. For homes located in warm regions with high humidity year-round or large spaces needing heavy-duty moisture extraction, consider a refrigerant dehumidifier.
2. For areas with lower temperatures or small rooms requiring quiet operation — such as basements during winter — opt for a desiccant dehumidifier.

By understanding these two main types of dehumidifiers and evaluating their pros and cons carefully, you can select an appropriate unit tailored to your home’s requirements while ensuring better control over mold growth prevention strategies.

How to Read and Interpret Labels on Products for Effective Mold Removal

When tackling mold issues in your home, understanding product labels is crucial to ensure their effectiveness and safety. Mold removal products often come with a variety of claims, technical terms, and instructions that can be overwhelming without proper guidance. This section provides a framework for reading and interpreting these labels effectively.

Key Components of Product Labels

  1. Look for active ingredients known for their efficacy against mold, such as:
    • Sodium hypochlorite
    • Hydrogen peroxide
    • Ammonium compounds
    • Vinegar (acetic acid)
  2. Ensure the product lists these ingredients prominently, along with the percentage concentration.
  3. To verify that a product is safe and effective, check for an EPA registration number.
  4. Only EPA-registered products have been tested to meet federal standards for mold remediation.
  5. Review whether the product is labeled for cleaning surfaces or for full remediation purposes.
  6. Some cleaners are designed solely to remove stains caused by mold but may not inhibit growth.
    • Protective gear requirements (e.g., gloves, goggles).
    • Ventilation needs during use.
    • Risks associated with inhalation or skin exposure.
  7. Carefully note application instructions like dilution ratios, dwell times (how long the product should remain on a surface), and rinsing requirements.
  8. Identify whether the product is safe for use on specific materials such as wood, drywall, tiles, or fabrics. Labels often specify non-corrosive options for delicate surfaces.

Common Label Terms and What They Mean

Term Meaning
“Antimicrobial” Inhibits growth of microorganisms but may not completely eliminate mold.
“Fungicidal” Specifically designed to kill fungal spores and prevent regrowth.
“Disinfectant” Kills bacteria and fungi but may not target all molds effectively.
“Biodegradable” The product breaks down naturally; may indicate fewer harsh chemicals.

Questions to Ask While Reviewing Labels

  • Is this product certified by reputable organizations like UL GREENGUARD or Safer Choice?
  • Does it offer long-term prevention benefits in addition to removal?
  • Are there any restrictions on where it can be used (e.g., outdoor vs indoor applications)?

By following these guidelines when reading labels on mold removal products, you can make informed choices that align with your specific needs while ensuring safety and effectiveness in combating mold problems at home.

Human found mold on wall , in your residential building after renovation stock photo

Key Factors to Consider When Investing in a Dehumidifier for Mold Prevention

Choosing the right dehumidifier is essential for maintaining a mold-free environment in your home. With so many options available on the market, it can be challenging to identify the features that matter most. This guide will help you understand the key factors to consider when purchasing a dehumidifier to prevent mold growth.

1. Room Size and Coverage Area

One of the first things to evaluate is the size of the area where you plan to use the dehumidifier. Dehumidifiers are typically rated based on their capacity in terms of square feet or cubic feet.

  • Small Rooms (e.g., bathrooms or closets): Opt for a compact unit with around 20-30 pints per day capacity.
  • Medium Rooms (e.g., bedrooms or offices): A mid-sized unit with 30-50 pints per day capacity is ideal.
  • Large Spaces (e.g., basements or living rooms): Choose a high-capacity unit, such as one rated for 50+ pints per day.

Ensure that the dehumidifier’s coverage matches or exceeds your room size for optimal performance.

2. Humidity Control Settings

A good dehumidifier should offer adjustable humidity controls, often referred to as a hygrostat. This allows you to maintain an ideal relative humidity level between 30% and 50%, which inhibits mold growth effectively.

Look for units with: – Digital displays showing current and target humidity levels. – Automatic sensors that adjust performance based on room conditions.

3. Energy Efficiency

Energy efficiency plays an important role in minimizing operational costs, especially if you plan to use your dehumidifier long-term. Check for units with an ENERGY STAR® certification, which indicates reduced energy consumption without compromising performance.

Feature Benefit
ENERGY STAR certified Lower energy bills and reduced environmental impact
Timer functionality Allows scheduled operation, reducing unnecessary usage
Eco-mode Automatically adjusts settings to conserve power

4. Noise Levels

For residential use, especially in bedrooms or shared spaces, noise level is an important consideration. Dehumidifiers typically emit sound between 40 dB and 60 dB, depending on their size and power.

  • For quiet environments: Look for units labeled “low-noise” or “whisper quiet.”
  • For basements or less frequented areas: Higher noise levels may be acceptable.

5. Drainage Options

  1. Manual Drainage: Requires emptying the water tank regularly when full.
  2. Continuous Drainage: Uses a drain hose connection to automatically remove water from the system, which is ideal for long-term use in high-humidity areas like basements.

Choose one based on your convenience and how often you want to interact with maintenance tasks.

6. Portability and Design Features

  • Units with wheels or handles make it easier to move between rooms if needed.
  • Compact designs work better in smaller spaces where aesthetics are important.

Additionally, features like washable filters can reduce recurring costs while keeping air quality high.

Summary Table of Key Considerations

Factor Recommendation
Room Size/Coverage Match capacity (pints/day) with room dimensions
Humidity Control Adjustable settings; aim for ~30%-50% relative humidity
Energy Efficiency Prefer ENERGY STAR units; look for eco-modes
Noise Levels Ideal range: ~40 dB–60 dB
Drainage Options Manual tanks vs continuous hose drainage
Portability Wheels/handles offer flexibility

Selecting a dehumidifier carefully based on these factors ensures not only efficiency but also long-lasting protection against mold issues within your space. Proper research and investment tailored to your needs can save time, effort, and money over time while keeping your indoor environment healthy and comfortable.

Key Factors to Consider When Investing in a Dehumidifier for Mold Prevention

Choosing the right dehumidifier is a critical step in preventing mold growth and maintaining a healthy indoor environment. With so many options available, it’s important to understand the key factors that should guide your decision. Below, we’ll explore these essential considerations to help you make an informed investment.

1. Room Size and Coverage Area

The size of the area you need to dehumidify plays a major role in selecting the most suitable device. Dehumidifiers are rated based on their capacity to remove moisture within specific room sizes, which is generally measured in square feet.

  • Small Rooms (e.g., bathrooms or closets): A small-capacity dehumidifier (20–30 pints) should suffice.
  • Medium Rooms (e.g., bedrooms or offices): Choose a model with a capacity of 30–50 pints.
  • Large Rooms or Basements: Opt for larger units that can handle over 50 pints per day.

Make sure to check the product specifications for coverage recommendations.

2. Humidity Removal Capacity

Humidity levels are another crucial factor when choosing a dehumidifier. Areas prone to high humidity, such as basements, may require devices with higher moisture extraction rates.

  • Moderate humidity levels (50%–60%): A standard unit will perform well.
  • Severe dampness or visible mold: Look for high-capacity units designed for excessive moisture removal.

Using an indoor hygrometer can help monitor current humidity levels and identify your home’s needs.

3. Energy Efficiency

Since dehumidifiers often operate continuously, energy consumption can become significant if efficiency is overlooked. Look for models certified by ENERGY STAR®, as they consume less energy while maintaining optimal functionality.

Feature Benefit
ENERGY STAR® certification Lower utility bills
Auto-shutoff function Prevents overuse and saves power

4. Noise Levels

  • For quiet operation, choose models with noise ratings below 50 decibels.
  • Higher-capacity units may produce more noise but are often equipped with multiple fan settings to reduce sound during use.

5. Drainage Options

  1. Manual Water Collection: The unit collects water in a built-in tank that requires periodic emptying.
  2. Best suited for smaller spaces and occasional use.
  3. Continuous Drainage: Utilizes a hose connection allowing water to drain automatically into a sink or floor drain.
  4. Ideal for long-term, hassle-free operation in high-moisture areas like basements.

Select the option that aligns with your convenience and maintenance preferences.

6. Portability and Design Features

  • Wheels and handles for easy transportation.
  • Compact designs for tight spaces.
  • Sleek finishes that complement modern interiors.

7. Built-In Air Filtration Systems

Some advanced dehumidifiers come equipped with air filtration systems that trap allergens like dust mites and mold spores while removing excess moisture from the air. These dual-function models can improve both air quality and humidity control at once.

By carefully evaluating these factors, you can select a dehumidifier tailored to your needs while minimizing future risks of mold growth in your home.